Okay I know that's a long name, but when I was looking up how to do this, I had a hard time finding much help online. So hopefully if you're looking for a tutorial on this, you've found one.
There are three main steps to creating these boards.
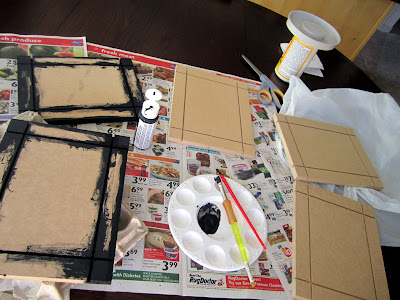
1) Painting
2) Mod Podging
3) Applying the Epoxy
So to begin with painting....
- Paint
- Brush (preferrably a kids, or not great one)
- Paper
- something to raise the board up, like and egg carton
The most time consuming part is getting in the little nooks, but remember that's also the most important since that's the only part that will really show at the end. Well, that and the edges.
Paint them completely and let them dry.
Meanwhile, find your picture and cut it to size. I cut it to the 9x7 size first then cut the long two edges, trim off the excess, then the short sides and trim off the excess.
Then on to the Mod Modge...
- Mod Podge
- Sponge Brush
- card board
- bowl
Have the picture pieces set out next to where they go and do one at a time.
Begin with the large center piece and apply a thin layer of Mod Podge over the entire part. Push out bubbles that form as it's drying. Then move on to the side pieces. You can use a paint brush to clean up the excess glue in the crevice after wards.
After that's fairly dry (it dries quickly), use the sponge to drag a layer from the top to the bottom and apply a thin layer all across the picture forming a protective coating. Make sure you seal the edges of the picture to the board, so Epoxy won't seep under.
Get it ready for the next step by placing it up on something, like a disposable bowl on cardboard, making sure it's a flat surface.
Then the Epoxy Resin.....
- Resin & Hardner (both in the box blow)
- Gloves
- Paper or plastic cups
- Plastic knife or popsicle stick
- straw
Follow the instructions carefully and use gloves, but basically use a 1/4 c. measuring cup and pour water in the disposable cup mark a line, do it again and mark it (& dry it out), so you can then pour equal parts resin and hardner in it.
After mixing the resin and hardner, use the knife to stir vigorously for 2 minutes. Making sure you scrape the side and bottom to get it thoroughly mixed. Bubbles will likely form, but that's okay.
Immediately pour the Epoxy onto the board, beginning in the middle and swirling around toward the outside edges. Smooth it into missed spots with the knife after. Let it sit for about five minutes to have it spread out and bring the bubbles to the top then take the straw and gently blow across the surface and it will pop the bubbles leaving a smooth glass-like look.
During the five minutes I use the excess that's dripping off to "batter" the side edges so it will be sealed also.
For the next couple hours you'll want to check on it periodically and scrape the underside so it won't harden with drips on the back.
Cover it with a shoe box or empty tote or something to keep dust and stuff off it for at least 8 hours. It will take between 48-72 hours to harden completely.
If you do have drips that hardened you can sandpaper them off at the end. I did this batch with a few 12-13 year old girls and they were able to manage it.
It turns out beautiful.


