4.06.2010

Easter Peeps!

This year I wanted  a cute little center piece for some of the tables, and this is what I came up with:
I took some balloons regular ones (not water balloons), blew them up to the size I wanted. I dipped them in white chocolate, let them harden.  Then I popped the balloons, and carefully peeled them out. Just for a little extra touch, I toasted some coconut and placed it at the bottom. They were a big hit with the kids!

3.17.2010

a little apron

I know it's been forever (a whole month) since I last posted. I hate people like me, who never keep their blog updated. Life has been crazy. We're waiting to move, expecting another baby, I'm taking classes and the hubs is finishing up medical school. I'm hoping life will slow down in the next few months and I will have a lot more time to devote to my little blog. Not to mention, I'll be in  a new place, with a new slate to decorate! 

My little guy loves to help me in the kitchen. So I decided to quickly make him his own little apron. It took m less than an hour. SO easy! Another plus, I already had this cute fabric that my mother-in-law gave me a while back. 

I had no pattern, but I just measured the little guys waist, around his neck (like how much the apron would need to hang) and about how long I would want it to hang on him. Then I just cut it out, looking something like this...
Next, I pined the sides and sewed it up.
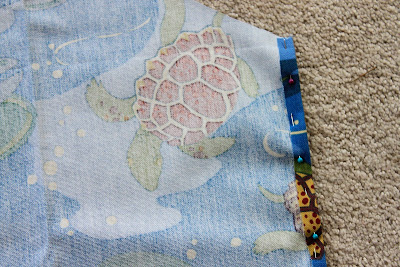
I had some this ribbon stuff, that actually came from something I bought. You know when you get those gift bag things that are tied together with a ribbon (I always save those). I just cut the ribbon and sewed it on.

The last thing I wanted to do was add a pocket. It was SUPER easy. You can do it too.
The only thing maybe I would have changed was not make the top of the apron so wide, but this nicely took the place of his bib that he refuses to wear. So I think I actually do like the wide top. Oh and I would have made the ties a tad longer.


Scrapblog,Scrapbook,Ethereality

2.15.2010

a new family tradition

I found the perfect sugar cookie recipe last year. I knew how unhealthy it was, so I wanted to wait a whole year to make it. And the time finally came!

They are the softest cookies and they taste divine!
1/2 cup butter
1/2 cup shortening
(You can use just one cup of margarine if you prefer, but the half butter cuts down on the hydrogenated oil and the shortening keeps them really soft. They taste just as good either way though.)
Blend above with 2 cups sugar
Add 2 eggs, mix well, then add 1 cup sour cream and 1 tsp vanilla and mix well.

In separate bowl combine dry ingredients
1/2 tsp baking soda
1/2 tsp salt
4 tsp baking powder
4 1/2 cup flour

Mix in dry ingredients by thirds to wet ingredients. mix till smooth. Chill dough in fridge at least one hour. Roll out on really well floured surface. (The dough is really sticky so you have to flour the top of the dough and the rolling pin too or else they just stick to everything. Don't worry about the flour weighing them down, I use tons)

Roll out, cut into shapes and place on ungreased cookie sheet. (I use parchment paper) Bake at 350 for 10 minutes

Frosting

1/4 cup butter
1/2 tsp salt
2 tsp vanilla
3 cups powdered sugar
1/4 cup milk
1/2 tsp almond flavoring

Mix well till smooth and frost cooled cookies.
I hope you had a Happy Valentine's Day!
Scrapblog,Scrapbook,Ethereality

2.10.2010

Kid Valentines simplified....


I found a cute idea over at Latdahblogspot.com  She made these cute cotton candy ice cream cones.  They are oh so simple and inexpensive to make.
I also found some glow sticks and thought they would be a cute little Valentines gift, a bit different then just candy.  The catch phrase is "You light up my life, Valentine. Here is a picture of what I came up with. I know how kids LOVE anything that glows so hopefully bracelets will be a hit.

2.02.2010

black apple doll

I attempted to make a doll. I never usually make girl things, since I have a boy. I've made blankets, burp cloths & tutus & that's about it. I saw this black apple doll here and found the pattern here. It wasn't very hard & it was quite fun. I was making it as a gift...but since it was my first, it had it's own little quirks...so I decided to keep it.

Maybe I'll try one again. 
Here she is.

As for making this little cutie, the only problems I stumbled across were these. My fabric was a cheap muslin (for the skin) and I was afraid the seams would tear easily, so I went back over them to stitch the seam (straight stitch, from the outsides). It doesn't look very cute though, so I recommend using a more durable fabric.

I also found that the fabric for the hair seemed to fray around her face (because I used cotton, the pattern recommends felt), so I just used Fray Check (love that stuff) to fix that little problem.

I also struggled with stitching up her head. That was tricky, but I think I could do a much better job next time. Tip: When you are sewing the front of the doll and the back together (using a skin-colored thread), change the thread when you do the hair, because when you turn it inside out you can see the skin-colored thread! Make sure you use coordinating thread in all the right places. That was probably my biggest mistake.

If you follow the pattern exactly, & don't make the same mistakes I did, it should turn out fine.
Scrapblog,Scrapbook,Ethereality

2.01.2010

Felt Fun


The other day I found some felt that had designs pressed in it and of course I had to get some and see what I could create out of it....these clips are what I came up with. I just traced some flowers, layered them, hot glued them all together and added a little bling, because that's just how I roll.
I think the girls really like them, it's a change from all the silk flower clips we are kind of tired of.
Cute, cheap, easy to make....need I say more.