9.11.2010

Homemade Epoxy Resin Boards

Okay I know that's a long name, but when I was looking up how to do this, I had a hard time finding much help online. So hopefully if you're looking for a tutorial on this, you've found one.

There are three main steps to creating these boards. 
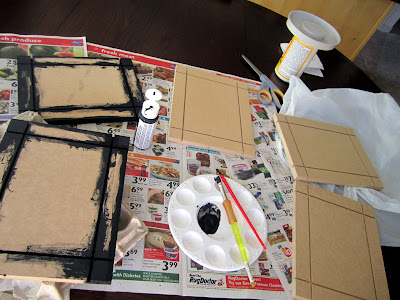
1) Painting     
2) Mod Podging     
3) Applying the Epoxy

So to begin with painting....
        • Paint
        • Brush (preferrably a kids, or not great one)
        • Paper
        • something to raise the board up, like and egg carton

The most time consuming part is getting in the little nooks, but remember that's also the most important since that's the only part that will really show at the end. Well, that and the edges.
Paint them completely and let them dry.

Meanwhile, find your picture and cut it to size. I cut it to the 9x7 size first then cut the long two edges, trim off the excess, then the short sides and trim off the excess.

Then on to the Mod Modge...
            • Mod Podge
            • Sponge Brush
            • card board 
            • bowl

Have the picture pieces set out next to where they go and do one at a time.

Begin with the large center piece and apply a thin layer of Mod Podge over the entire part. Push out bubbles that form as it's drying. Then move on to the side pieces. You can use a paint brush to clean up the excess glue in the crevice after wards.

After that's fairly dry (it dries quickly), use the sponge to drag a layer from the top to the bottom and apply a thin layer all across the picture forming a protective coating. Make sure you seal the edges of the picture to the board, so Epoxy won't seep under.

Get it ready for the next step by  placing it up on something, like a disposable bowl on cardboard, making sure it's a flat surface.

Then the Epoxy Resin.....

          • Resin & Hardner (both in the box blow)
          • Gloves
          • Paper or plastic cups
          • Plastic knife or popsicle stick
          • straw


Follow the instructions carefully and use gloves, but basically use a 1/4 c. measuring cup and pour water in the disposable cup mark a line, do it again and mark it (& dry it out), so you can then pour equal parts resin and hardner in it.

After mixing the resin and hardner, use the knife to stir vigorously for 2 minutes. Making sure you scrape the side and bottom to get it thoroughly mixed. Bubbles will likely form, but that's okay.

Immediately pour the Epoxy onto the board, beginning in the middle and swirling around toward the outside edges. Smooth it into missed spots with the knife after. Let it sit for about five minutes to have it spread out and bring the bubbles to the top then take the straw and gently blow across the surface and it will pop the bubbles leaving a smooth glass-like look.

During the five minutes I use the excess that's dripping off to "batter" the side edges so it will be sealed also.

For the next couple hours you'll want to check on it periodically and scrape the underside so it won't harden with drips on the back.

Cover it with a shoe box or empty tote or something to keep dust and stuff off it for at least 8 hours. It will take between 48-72 hours to harden completely.


If you do have drips that hardened you can sandpaper them off at the end. I did this batch with a few 12-13 year old girls and they were able to manage it. 
It turns out beautiful.

8.10.2010

Mario Hats

My son is obsessed with Mario these days.
 He just had a birthday party so I decided to make all the kids matching hats.
It is difficult to find Mario anything, so everything was homemade.
I found my instructions here, but here are some from me...

I made 10 which took about 2 1/4 yards of red fleece,
(For less hats, I'd plan 1/2 yard for two)
and I bought 6" of white felt.
And matching thread of course.
I took a 12" bucket lid and another 4" lid to trace. 
First trace the large lid and cut out two (folding over the fabric works best).
Then cut a smaller hole in one of the two large circles of fleece.

Sew around the outer edge of the two 12" circles.
Then flip out, so the seam is on the inside.
Use the leftover corners to cut out two brim shaped pieces.
Sew them together along the outer curved edge.
Flip out, so the seam is on the inside.
Then  - sorry no picture - sew the short curved side of the brim to the smaller 4" opening on the hat, 
keeping the hat turned so the seam is on the inside.
 Use the leftover middle circle to cut out the M for the front of the hat.
And then cut out about a 2 inch circle of white felt.
Sew the M to the felt then the felt to the front of the hat.
And soon you'll have the finished product.
It took me roughly 5 hours to make 10, with breaks for lunch and such.

8.03.2010

play food

I have an awesome sister-in-law who sent me this cute little lunch sack in the mail.
It's all made out of felt.
Isn't it so cute!
She has five kids, she's like Wonderwoman.
Scrapblog,Scrapbook,Ethereality

something new

Some friends of my put in a big order of these cute flowers that we made into earrings. I'm not sure where she ordered them from, but can find out if anyone is interested. They ended up being a dollar or less per pair. Then I just bought some earring backings from JoAnn's to make them into earrings.

Such an easy, inexpensive, CUTE project.
Don't spend 7 bucks a pair, here.

Then I was on a little earring kick and remembered that I had this pair that I liked, but didn't love
But I do love pearls.
So, from this...I made this.
And the best part is I could still use the first earrings if I wanted to.

Scrapblog,Scrapbook,Ethereality

7.30.2010

Tween Earings 101

I have been experimenting with Jewelry making lately and have found it pretty inexpensive to make my own.  I thought I'd let you all in on this one:)  First I found the flat ear wires, then I got a bag of small rings (it looks just like the one above only for rings) They were about $1.50 for like 30.  You will only need two small sets of needle nose pliers to pull the small metal rings open & closed. They make it really simple to make jewelry.


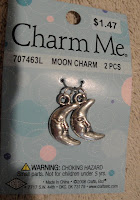
 Then I found some "charms" at Hobby lobby like these ones, the things in the middle are actually tiny fake candy for a mini Christmas tree but I thought they could be cute candy earrings for my girls to give out this holiday season, I also found tiny bells that worked well.  Of course being at my favorite store "Hobby Lobby" I waited until these products were all 50% off.  Which is almost every other week.

So all you do is open one of the tiny rings with your pliers (one in each hand pulling opposite directions) put on your charm and your earring, close it back up and whalla you have a new pair of earrings. They would of cost you at least $5 a pair at Claire's. 
HB even had these professional earring holders 10 for $2.99 (not on sale)
When I did the math - with the sales, it only cost me less than $1.25 per pair of earrings.  Wow! Please don't tell anyone, I want this to be our little secret:) Now go out and make some gifts!


7.07.2010

Scrapbook Paper Decor

I needed to come up with something unique for my sister-in-laws baby shower. She's having a boy after having three girls and she's such a cute girl  couldn't stand the thought of regular party store decorations. So after scouring the internet I found some cute ideas made of scrapbook paper. 
It's fabulous because you can totally personalize the color/pattern scheme and it's relatively inexpensive.

Here's the LINK to the place I found the idea, then here's the LINK to the instructions per Mrs. Martha Stewart.

I started out with this banner. 
The key is to find two-sided scrapbook paper. 
Then I moved onto this wreath.

The banner: I punched holes in the top corners and strung it up on kite string.
The wreath: I followed the instructions on Martha Stewart's website  but found it a little hard to handle so I hot glued it to a thick piece of cardboard. Then I felt it looked unfinished so I cut out an L for the center. I printed it out on the largest font possible then cut that out, traced it to the back of the paper and used an X-acto knife to cut it out.


I really liked the results. 

4.06.2010

Easter Peeps!

This year I wanted  a cute little center piece for some of the tables, and this is what I came up with:
I took some balloons regular ones (not water balloons), blew them up to the size I wanted. I dipped them in white chocolate, let them harden.  Then I popped the balloons, and carefully peeled them out. Just for a little extra touch, I toasted some coconut and placed it at the bottom. They were a big hit with the kids!

3.17.2010

a little apron

I know it's been forever (a whole month) since I last posted. I hate people like me, who never keep their blog updated. Life has been crazy. We're waiting to move, expecting another baby, I'm taking classes and the hubs is finishing up medical school. I'm hoping life will slow down in the next few months and I will have a lot more time to devote to my little blog. Not to mention, I'll be in  a new place, with a new slate to decorate! 

My little guy loves to help me in the kitchen. So I decided to quickly make him his own little apron. It took m less than an hour. SO easy! Another plus, I already had this cute fabric that my mother-in-law gave me a while back. 

I had no pattern, but I just measured the little guys waist, around his neck (like how much the apron would need to hang) and about how long I would want it to hang on him. Then I just cut it out, looking something like this...
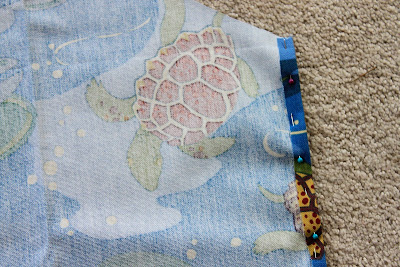
Next, I pined the sides and sewed it up.
I had some this ribbon stuff, that actually came from something I bought. You know when you get those gift bag things that are tied together with a ribbon (I always save those). I just cut the ribbon and sewed it on.

The last thing I wanted to do was add a pocket. It was SUPER easy. You can do it too.
The only thing maybe I would have changed was not make the top of the apron so wide, but this nicely took the place of his bib that he refuses to wear. So I think I actually do like the wide top. Oh and I would have made the ties a tad longer.


Scrapblog,Scrapbook,Ethereality

2.15.2010

a new family tradition

I found the perfect sugar cookie recipe last year. I knew how unhealthy it was, so I wanted to wait a whole year to make it. And the time finally came!

They are the softest cookies and they taste divine!
1/2 cup butter
1/2 cup shortening
(You can use just one cup of margarine if you prefer, but the half butter cuts down on the hydrogenated oil and the shortening keeps them really soft. They taste just as good either way though.)
Blend above with 2 cups sugar
Add 2 eggs, mix well, then add 1 cup sour cream and 1 tsp vanilla and mix well.

In separate bowl combine dry ingredients
1/2 tsp baking soda
1/2 tsp salt
4 tsp baking powder
4 1/2 cup flour

Mix in dry ingredients by thirds to wet ingredients. mix till smooth. Chill dough in fridge at least one hour. Roll out on really well floured surface. (The dough is really sticky so you have to flour the top of the dough and the rolling pin too or else they just stick to everything. Don't worry about the flour weighing them down, I use tons)

Roll out, cut into shapes and place on ungreased cookie sheet. (I use parchment paper) Bake at 350 for 10 minutes

Frosting

1/4 cup butter
1/2 tsp salt
2 tsp vanilla
3 cups powdered sugar
1/4 cup milk
1/2 tsp almond flavoring

Mix well till smooth and frost cooled cookies.
I hope you had a Happy Valentine's Day!
Scrapblog,Scrapbook,Ethereality

2.10.2010

Kid Valentines simplified....


I found a cute idea over at Latdahblogspot.com  She made these cute cotton candy ice cream cones.  They are oh so simple and inexpensive to make.
I also found some glow sticks and thought they would be a cute little Valentines gift, a bit different then just candy.  The catch phrase is "You light up my life, Valentine. Here is a picture of what I came up with. I know how kids LOVE anything that glows so hopefully bracelets will be a hit.

2.02.2010

black apple doll

I attempted to make a doll. I never usually make girl things, since I have a boy. I've made blankets, burp cloths & tutus & that's about it. I saw this black apple doll here and found the pattern here. It wasn't very hard & it was quite fun. I was making it as a gift...but since it was my first, it had it's own little quirks...so I decided to keep it.

Maybe I'll try one again. 
Here she is.

As for making this little cutie, the only problems I stumbled across were these. My fabric was a cheap muslin (for the skin) and I was afraid the seams would tear easily, so I went back over them to stitch the seam (straight stitch, from the outsides). It doesn't look very cute though, so I recommend using a more durable fabric.

I also found that the fabric for the hair seemed to fray around her face (because I used cotton, the pattern recommends felt), so I just used Fray Check (love that stuff) to fix that little problem.

I also struggled with stitching up her head. That was tricky, but I think I could do a much better job next time. Tip: When you are sewing the front of the doll and the back together (using a skin-colored thread), change the thread when you do the hair, because when you turn it inside out you can see the skin-colored thread! Make sure you use coordinating thread in all the right places. That was probably my biggest mistake.

If you follow the pattern exactly, & don't make the same mistakes I did, it should turn out fine.
Scrapblog,Scrapbook,Ethereality

2.01.2010

Felt Fun


The other day I found some felt that had designs pressed in it and of course I had to get some and see what I could create out of it....these clips are what I came up with. I just traced some flowers, layered them, hot glued them all together and added a little bling, because that's just how I roll.
I think the girls really like them, it's a change from all the silk flower clips we are kind of tired of.
Cute, cheap, easy to make....need I say more.